Angular is a robust framework packed with features and toolings to simplify front-end development. Understanding the best way to create Angular applications that perform, scale well, and are easy to maintain can be a daunting task for many developers. Based on my experience as an Angular consultant and trainer, I’ve compiled a list of key principles that prove to be invaluable in all the projects I’ve worked on.
In this article, we’ll go through eight key principles to follow for a successful Angular project. This article will provide you with a high-level overview of each principle with practical examples and links to additional resources that goes more in-depth on each topic.
If you prefer a video version of this article, watch the entire discussion on Youtube.
TLDR:
- Monorepo
- Continuous delivery
- Feature toggling
- High ROI testing
- Reactive architecture
- Efficient development
- Design system and UI toolkits
- Monitor and optimize performance
Monorepo

A monorepo is a single repository containing multiple distinct projects with well-defined relationships. A monorepo is different from code co-location by having a repository containing several projects with no well-defined relationships among them.
The benefit of monorepo, especially in enterprise scenarios includes:
- Single infrastructure for multiple projects – A monorepo reduces the overhead of creating new projects. You can add more projects to the current setup with minimum impact on the infrastructure and its complexity.
- Easy code sharing – Monorepos removes the requirement to create new npm packages or publish new versions of a library the project uses. A monorepo setup allows shared code to be set up as a library inside the workspace. This library can then be referenced directly by other parts of the workspace that requires them.
- Transparency – Having all the code in a single location gives better visibility to everyone in the team and makes collaboration easier.
- Tooling – Build systems such as Nx provides us with the necessary tooling and assistance to work efficiently in a monorepo environment. Nx allows us to create more efficient pipelines by identifying the parts of your application affected by your code changes. This allows us to run partial lint and tests that target only the affected parts – saving valuable time and resources. Furthermore, NX also allows us to set module boundaries to control the dependency flows in the workspace to ensure that the different parts of our project are wired up correctly and there are no cyclic dependencies.
You can learn more about creating a scalable architecture for an Angular monorepo in the Monorepo Blueprint.
Domain-driven Architecture
How you structure a monorepo is crucial to the scalability of the project. The ideal approach is to follow the domain-driven architecture. A domain-driven architecture divides the workspace according to the domain’s division, not the underlying technologies. For example, the topmost divisions in a banking application would be “accounts”, “investments”, and “loans” instead of “components”, “pipes”, and “directives”.
After dividing the application into domains, each domain can be further split up into the following:
- Shell – exposes feature libs from subdomain, referenced by apps (example: route lazy-loading (optional for small domains))
- API – exposes UI, domain, and util to feature libs outside of the domain
- Feature – exposes smart components (example: pages and modals) to shells/apps, can access other domains’ APIs
- UI – use case agnostic presentation components/directives
- Domain – facades, state, HTTP, interfaces, and domain-specific logic
- Util – domain agnostic helpers (example: date format)

The workspace can be further divided into different libraries following the layered architecture approach. A layered architecture divides the application into layers where each layer performs a specific role within the application. A typical division in an Angular application would be as follows:
- layer for presentational/dumb components
- layer for smart components
- layer for data access (example: web sockets)
- layer for interfaces
Below is an example of to divide an application in a monorepo following the domain-driven and layered architecture:

Pro tip: If you’re using Nx for your monorepo, you can use Nx tags and module boundaries to control dependency flow between the application and libraries to ensure one-way dependency flow between the different layers – making sure there are no cyclic dependencies.
Continuous delivery

Continuous delivery is a software engineering approach in which teams produce software in short cycles, ensuring more reliable software releases at any time. Delivering often with small changes is beneficial as it results in fewer errors and faster recovery in case of errors. From a product perspective, a short release cycle allows for faster feedback, allowing the team to pivot quicker wherever necessary.
From a development standpoint, practicing continuous delivery or trunk-based development often results in fewer merge conflicts as branches are quickly merged and deployed – reducing the possibility of multiple stale branches in the project.
You can learn more about continuous delivery in the following blog posts:
- Implementing Continuous Deliver Through Five Steps
- Hot to Implement Continuous Delivery in Highly Regulated Companies
Feature toggling

Feature toggling or feature flag is a technique that allows teams to modify system behavior without changing code. Feature toggling is necessary for releasing fast, especially when doing continuous delivery or trunk-based development. This approach allows deploying new features into production, without necessarily releasing or enabling them. In addition, if we discover a critical bug in a new feature, we can immediately disable it, without going through a deployment cycle.
Other uses of feature toggling include:
- Split and beta testing – Features can be enabled and disabled for specific users or groups of users allowing the team to get test new features or fixes with a limited set of users before doing a full release.
- Waiting for external conditions – Sometimes a frontend release is tied to a backend release, a database migration, or a specific deployment date. With feature toggling, the frontend application can be deployed to production early with the new updates turned off. Once the frontend gets the green light from these external factors, the team will only need to flip a switch to enable the new updates.
There are a few different ways to implement feature toggling in a frontend application:
- Poor man’s feature toggling – use a static JSON file with a list of features that can be toggled on and off
- GUI system with a dashboard to toggle each feature (example: LaunchDarkly and Firebase’s Remote Config)
- Custom solution – roll out a custom feature toggling method as per your application’s requirements
Most teams start with the poor man’s feature toggling and upgrade to a more sophisticated solution as the application and requirements grow.
You can read more about feature toggling in How to use Feature Toggling in Angular Apps.
High ROI Testing

Having 100% test coverage is often the goal, but might not be ideal for most use cases. Identifying which parts of the application to test and using which testing tools or method is crucial to ensure your code and application is functioning correctly.
Instead of testing everything, focus on writing tests with the highest return on investment (ROI). Testing your application can be broken down as follows:
- Cover all use cases with integration tests (tools: Cypress component tests)
- Cover edge cases and calculations with unit tests (tools: Jest)
- Run static checks by using strict Typescript rules to avoid errors like null references (tools: eslint)
- Write end-to-end tests and smoke tests (tools cypress)

Learn all about testing in Angular by joining the Angular Testing Workshop.
Reactive Architecture
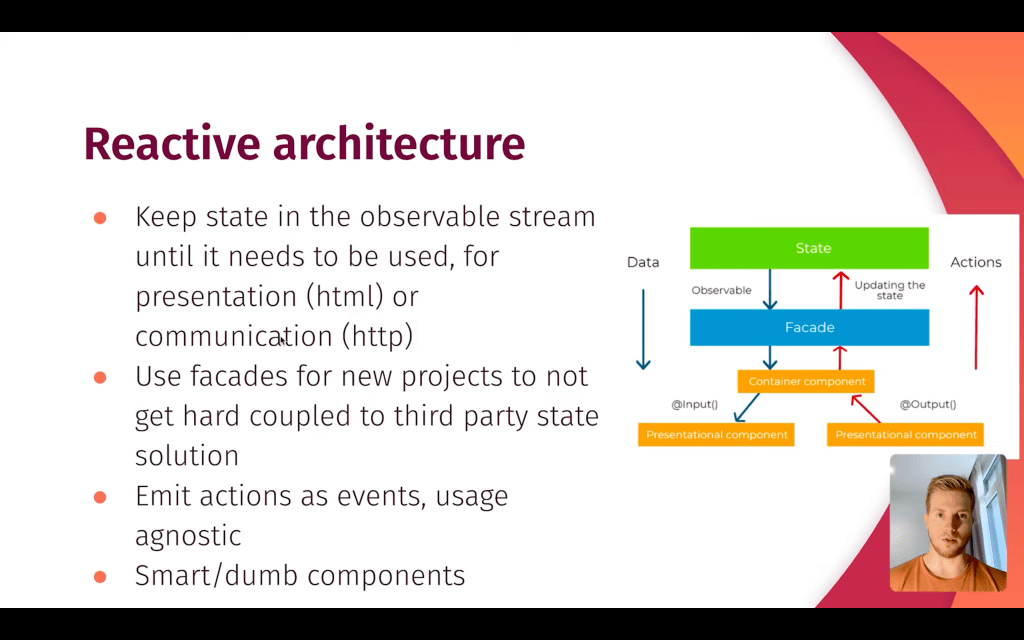
Reactive architecture follows a completely different paradigm than imperative architecture’s approach of using callbacks. The reactive architecture uses asynchronous events data stream over time and its propagation of change. Below are a few tips to implement a more reactive architecture in your Angular apps:
Keep state in an observable stream until its used
Observables are typically used either for presentation (HTML) or communication (HTTP). A reactive architecture discourages you from converting these observables into promises or subscribing early. Instead, keep the observable in a stream until it is used to maintain its reactive nature.
Use facades to avoid hard-coupling
Facades are especially useful when working on a new project to avoid hard coupling to a third-party state solution. A facade acts as an abstraction layer for the entire data access part of your application. For example, instead of dispatching an action or using a selector directly from a state management solution (example: NgRx, NGXS, Akita, etc.), you would call a function in the facade, which then relays the call to the state management solution. This setup allows us to switch the underlying implementation without a major refactoring of the application.

Smart and dumb components
Split your components into smart and dumb components, where smart components are aware of the state and dumb components rely solely on their inputs. This split creates a cleaner data flow where observables are passed down from the state to a smart component and finally to the dumb component. When something happens in the dumb component, the reverse flow is triggered via events – the dumb component emits an event that makes its way to the smart component, relaying the information to the state.
Emit usage agnostic events
Dumb components that rely on emitting events to their parents should be usage agnostic. You can compare this behavior to a button click. The button component emits a click event which is usage agnostic. The parent component then decides what to do with the emitted button’s click event. Similarly, dumb components should emit events whose function can be determined solely by their parent component. This setup makes the components more flexible and reduces coupling between the event emitter and the event handler.
You can learn more about reactive architecture in the following blog posts:
- Refactoring Angular Apps To Reactive Architecture
- Creating A Reactive State Flow By Extracting To Presentational Component
Efficient Development Process

Being successful when working with Angular in an enterprise setup goes beyond the code itself. Working effectively within the team and having an efficient development process are equally important. Below are a few suggestions to create a more efficient development process:
- Pick a (or multiple) chapter lead – The chapter lead’s responsibility is to draft and refine a story. The story is then divided into subtasks which are later assigned to the team members
- Organize story kickoff – This is where the chapter lead presents the story to the team, discussing the best approach to implement the story and creating any necessary adjustments before any development begins
- Pair-program the skeleton of the story – Before dividing the subtasks between the team, start with pair-programming the core fundamentals of the story. Pair programming at this stage will ensure that the team is in agreement with the naming convention, and structure and creates less confusion and regression when the tasks are divided between the team.
- Organize a continuous improvement meeting – A weekly or biweekly meeting that serves as a democratic way for everyone to have a voice and an easy way to be heard. The diagram below shows an example of what is involved in a continuous improvement meeting over a period of time.

You can learn more about the efficient development process in the following blog posts:
- Efficient Sprints – how to build quality software fast
- What is Holding your Angular team’s productivity back
- 3 Tips to Double the Productivity on an Angular Team
Design system and UI toolkits

Design systems and UI toolkits make developing your interfaces easier and more consistent. Instead of building ad-hoc components, a design system forces us to break down the design into smaller building blocks that can be reused across the application. Implementing a robust design system will reduce the risk of having UI bugs such as inconsistent behaviors and regressions when a new page or component is introduced.
Tools such as Storybook provide documentation, automated testing, and various other useful toolings for your design system. Storybook allows you to create, document, and test your components in isolation via their interface. This allows us to focus on building components and pages without having to mess with data, APIs, or business logic.
UI toolkits such as TailwindCSS can also aid in the UI development process by minimizing the amount of custom CSS we have to write. TailwindCSS provides utility classes and design tokens that help in creating a more consistent look and feel across your application. Tailwind’s approach to using design tokens is not only a huge time saver, but it also gives us the flexibility of modifying the styling of the entire app easily by modifying the values of the design tokens without having to update multiple stylesheets.
Read How to structure styling in an Angular App for more tips on styling your Angular applications.
Monitor and optimize performance

Performance is extremely important in front-end applications as they directly impact the application’s user experience. Poorly performing applications can be frustrating for the end users. For example, an e-commerce site that is slow and unresponsive might deter users which could have a direct impact on the business.
Although there is a growing number of tools to help optimize your application’s performance, working with performance remains one of the more challenging aspects of development for many developers. Here are a few tips to monitor and optimize your Angular application’s performance:
- Set realistic bundle budgets – Bundles are the set of compiled JavaScript files, which are produced by the build process. Setting bundle budgets ensures every part of the application stays within the size boundaries that you define. This will force us to better optimize the application so our bundles don’t exceed the allowed size. Splitting up your app into multiple modules and lazy-loading them is one of the ways to decrease the size of each bundle.
- Webpack bundle analyzer – Webpack bundle analyzer is a tool to help us analyze the application’s bundle. It allows us to explore every part of the application (including external libraries) visually and find out which part of the application has the largest bundle size.
- Low-hanging fruits – Separating components into smart and dumb components, using the `OnPush` change detection strategy, and embracing a more reactive architecture can significantly boost your app’s performance. Furthermore, substituting large libraries for smaller library alternatives can also improve your app performance and reduce your overall application size.
- RxAngular – You can also implement [RxAngular](https://www.rx-angular.io/)’s more efficient change detection mechanism and other performance optimizations tooling the library offers to further optimize your app.
Read 18 Performance Optimization Techniques for a more in-depth guide (with practical examples) to performance optimizations for Angular applications.
Conclusion
Angular is a robust and versatile framework that is especially useful in enterprise settings. We’ve covered the main key principles that I follow for all my projects and have proven time and time again to be invaluable. Follow these eight battle-tested key principles to get the most out of the Angular framework and future-proof your Angular applications.
You can learn more about Angular best practices (including a deep dive into these key principles) in my Angular Architect Accelerator Course. The course is a proven and tested implementation program that teaches you how to become an in-demand Angular architect and accelerate your career in just 8 weeks.


