Performance is extremely important in front-end applications as they directly impact the application’s user experience. Poorly performing applications can be frustrating for the end-users. For example, an e-commerce site that is slow and unresponsive might deter users which could have a direct impact on the business.
Although there is a growing number of tools to help optimize your application’s performance, working with performance remains one of the more challenging aspects of development for many developers.
Performance isn’t always continuously measured as part of the development cycle, causing performance problems to be caught at later stages of development. It doesn’t help that performance bottlenecks don’t usually display symptoms in the early stages of development. It often starts to reveal itself as the app grows in size and complexity. At this point, it is most likely too big and difficult to refactor.
Drawing from their years of experience in the industry, Christian and Michael discuss 18 techniques to optimize your Angular application’s performance.
TLDR:
- Preconnect critical resources to speed up initial resource fetch
- Preconnect critical URLs used in the bootstrap phase or important URLs used later
- Preload and prefetch immediate resources for the Largest Contentful Paint (LCP)
- Prioritize the resources with `fetchpriority`
- Only include styles visible in the main bundle and move other imports directly into the respective component
- Only render what is needed
- Lazy load images that are outside the viewport
- Check your libraries
- Use `OnPush` change detection in all components to reduce change detection and template re-evaluation
- Avoid top-down Change Detection
- Disable `zone.js` as the default Change Detection System
- Schedule app initialization into a new task to reduce Total Blocking Time (TTB).
- Disable initial sync routing and schedule navigation manually to reduce TTB
- Schedule and prioritize rendering tasks
- Fetch data included in main content on app initialization to reduce the time of Largest Contentful Paint (LCP)
- Pass Observables directly as inputs
- Use `rxFor` in favor of `ngFor` to get a non-blocking rendering of lists
- Avoid using `@HostListener(‘document’)`
1. Preconnect critical resources to speed up initial resource fetch
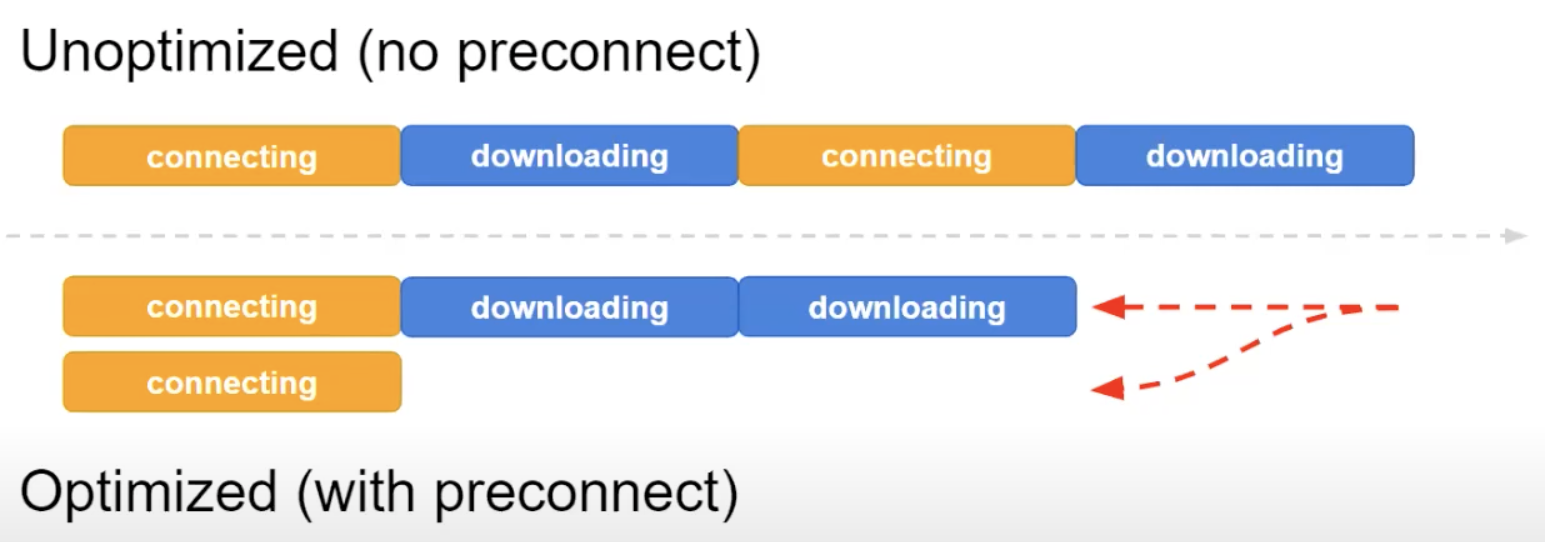
Preconnect is a technique where the browser initiates a connection to the specified domain at an earlier point in time, thus establishing more HTTP connections in parallel and speeding up the HTTP handshake when the URL is actually requested. This technique is ideal for URLs that the application will hit as soon as the application bootstraps. You can speed up the resource loading process by adding the `preconnect` attribute to the specific resources you want to load early.
The code above moves the connection time to the very beginning (orange block in the image below) and parallelizes the HTTP requests allowing the application to focus solely on fetching the data after it bootstraps.
2. Preconnect critical URLs used in the bootstrap phase or important URLs used later
Similar to pre-connecting to speed up critical resources, we can also preconnect critical URLs to speed up the HTTP process to get the required data. This process is especially effective when your app makes a lot of HTTP requests.
You can prepare the app for the HTTP requests you want to perform to further optimize the process. This could be in the form of generating dynamic HTML snippets for the URLs that you are using depending on the page you’re on.
Every project is set up differently and has different requirements and constraints. Depending on your project, you could either use a static snippet and preconnect to a set of URLs or automate this by creating a custom solution such as a custom builder or a configurable part in the `angular.json` that can generate the HTML snippet dynamically.
3. Preload and prefetch immediate resources for the Largest Contentful Paint (LCP)
It is important to prioritize when loading critical resources for your website. This could involve:
- Loading the page styles at an earlier or later point in time (depending on their importance for the current page)
- Loading images earlier so the images are ready once the page loads
Preload and prefetch are two approaches for prioritizing loading resources. Preload tells the browser that it must download the given resource as soon as possible (high priority). It is commonly used to load content that will be visible on the page, such as content below the fold that isn’t visible in the viewport.
A resource can be preloaded by setting the `rel` attribute to `preload`.
Prefetch, on the other hand, tells the browser that it can download the given resource even if it isn’t detected on the current page (low priority). This is commonly used for fetching content that will be required upon the next navigation – reducing the number of resources to be loaded after the navigation.
A resource can be preloaded by setting the `rel` attribute to `prefetch`.
4. Prioritize the resources with `fetchpriority`
Preloading and prefetching can be further prioritized using the `fetchPriority` attribute. Prioritizing resource loading strategically can optimize the largest-contentful paint (LCP) image of your application drastically, especially when you have a lot of resources that are preloaded and prefetched.
You can specify a different priority for each preloaded or pre-fetched resources by setting the `fetchPriority` attribute to the following values:
- High – Fetch at high priority
- Low – Fetch at low priority
- Auto – Default, the browser decides what is best for the user
Currently only available in Chrome and Edge.
5. Only include styles visible in the main bundle and move other imports directly into the respective component
Using a framework like Angular offloads some of the heavy liftings. Angular’s build process automatically inlines some CSS rules to elements that are visible in the viewport – optimizing your styles to a certain extent.
This isn’t an issue if your application’s CSS is organized well as Angular takes care of loading only the CSS used in the components rendered. However, if you are referencing multiple CSS files with multiple imports from other CSS files, this could quickly cause performance problems.
There is no automated way or smart hack around optimizing your styles. The rule of thumb is to always distribute the styles on all the bundles instead of loading all the styles at the beginning. Don’t overload styles and avoid loading styles that aren’t required. In the context of Angular, lazy load your components and make sure that component-specific styles live in the component’s stylesheet instead of pulling everything from a global stylesheet.
6. Only render what is needed
Focus on rendering only elements that are visible in the viewport and deprioritize the rest. This will ensure that you are using all the available resources to load what is immediately viewable by the user.
Virtual scrolling is a JavaScript approach to displaying a list efficiently by rendering only the contents visible within the viewport. There are a few libraries that help you render long lists in a performant way such as Angular Material’s Scrolling CDK.
Viewport observation using the Intersection Observer API is another approach to monitoring if an element is currently in the viewport or not. You can then use this information to execute some code or render any additional nodes. You can listen to the intersection event by using the following:
You can read more about how the intersection observer is used in Angular to optimize performance in this blog post.
You can set the target element’s `content-visibility` to the following values depending on the desired behavior:
- `visible` – No effect. The element’s contents are laid out and rendered as normal.
- `hidden` – The element skips its contents.
- `auto` – The element turns on layout containment, style containment, and paint containment.
7. Lazy load images that are outside the viewport
The `img` and `iframe` elements include a `loading` property to instruct the browser when to load its contents. The `loading` property accepts the following values:
- `lazy` – delays loading the content until the element is visible
- `eager` – loads the content immediately
Set the `loading` property to `lazy` as much as possible to improve your page’s load speed. The only elements that shouldn’t be loaded lazily are contents above the fold. Loading these contents lazily deprioritizes them which could result in a significant delay in displaying the content after the page loads.
If you have a long list of elements that are partially above the fold when the page loads, you could set the `loading` attribute dynamically. You could set the attribute to `eager` for the first few elements and `lazy` for the remaining elements which will be below the fold when the page loads. This will ensure that loading the first few images is given higher priority.
8. Check your libraries
Huge unoptimized libraries can also be the source of your application’s performance bottlenecks. Always check the libraries you add to your projects using the bundle size analyzer tool and flame charts. These tools will quickly show you how the libraries are affecting your applications.
Avoid using huge libraries unless necessary. Momentjs and some translation libraries are known for adding a lot of kilobytes to your application. Unless you are using a lot of their features, it is best to find a lighter library or implement a subset of the functionality yourself.
Another common performance issue introduced by third-party libraries is using multiple UI libraries. Your project might be using bootstrap for one part of the application and material in another. If possible, it’s best to reduce the number of UI libraries used or install only the necessary modules that you are using to avoid the extra cost.
9. Use `OnPush` change detection in all components to reduce change detection and template re-evaluation
Angular components, by default, re-renders from top to bottom of the component tree. A button click in a component at the bottom of the tree will mark the component as dirty, triggering Angular Zone. Angular Zone then calls `appref.tick()` internally, which causes the app to rerender. The default behavior rerenders the entire component tree – causing over-rendering.
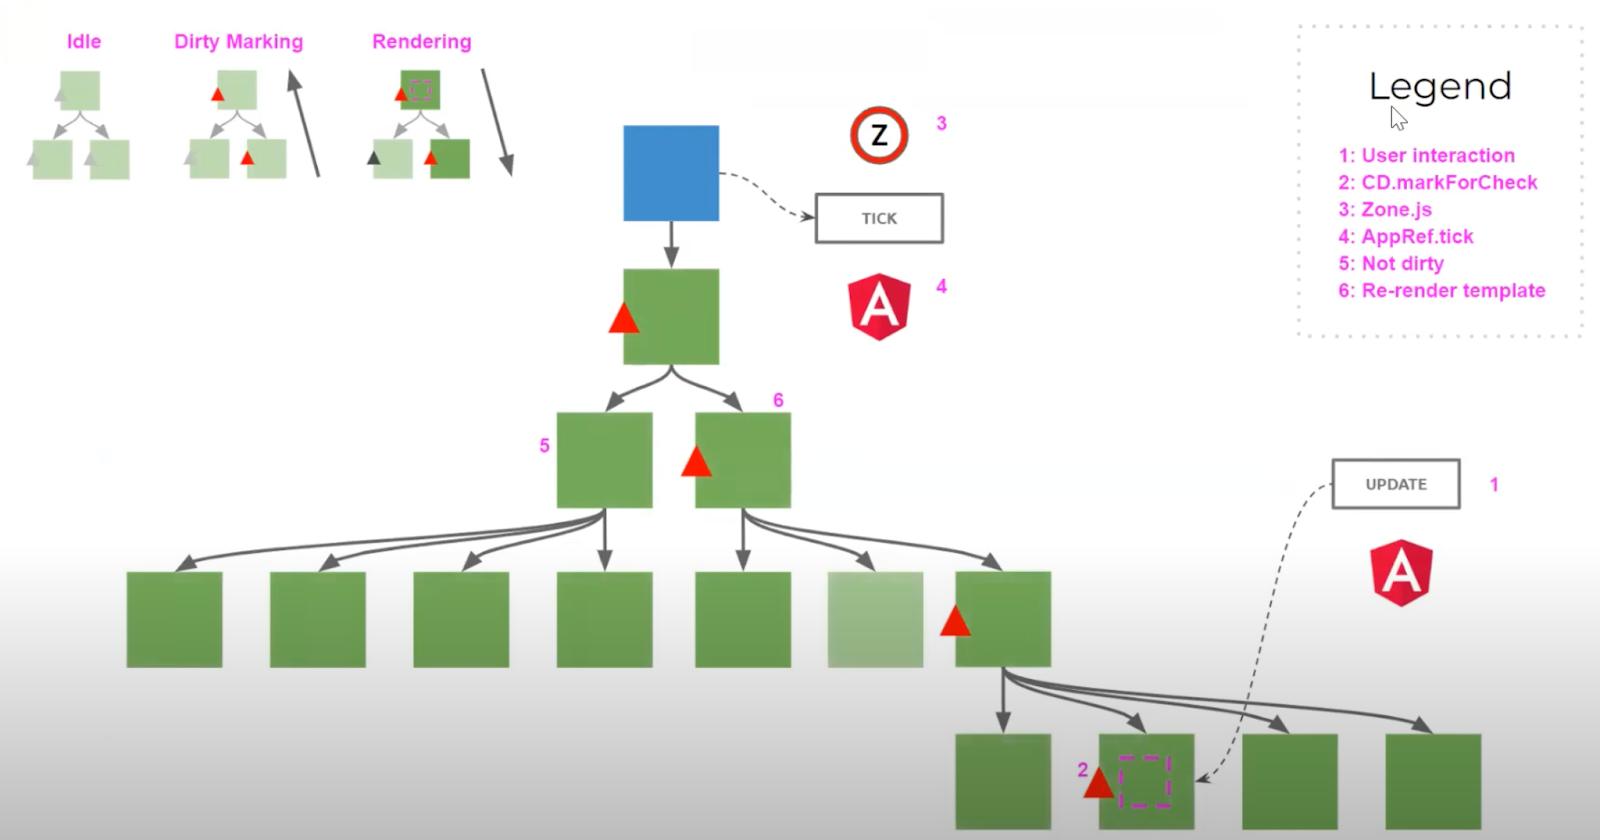
Applying `OnPush` change detection strategy will optimize the rerender process by rerendering only the specific path that was impacted by the change. A button click in a component at the bottom of the tree will still mark the component as dirty, but instead of rerendering the entire application, it will only rerender the path that contains the dirty component.
`OnPush` change detection is an improvement from the default change detection strategy. However, Angular still over-renders components that aren’t affected but are along the path of the component.

10. Avoid top-down Change Detection
As discussed in the previous technique, `OnPush` change detection improves performance significantly by only re-rendering components in the path containing the affected component. The rendering cycle can be further optimized by reducing the over-rendering of unaffected components in said path.
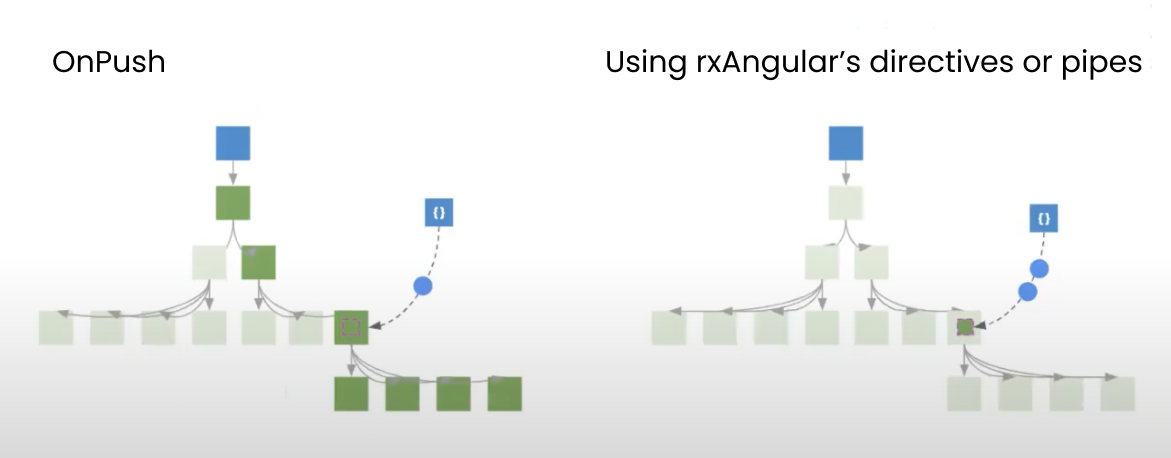
`rxAngular` lets you re-render only the affected component without affecting any other components in the component tree. If you click a button on a component, only the component containing the button is updated, without causing a re-render on any other components – avoiding the over-rendering caused by Angular’s top-down rendering cycle.
`rxAngular` uses structural directives similar to `ngIf` and `ngFor` to keep the re-render process contained within the component. Instead of running `detectChanges` at a component level, `rxAngular` runs `detectChanges` on the embedded view directly, hence skipping the entire top-down change detection cycle.
The image below shows a comparison between the `OnPush` change detection strategy with using `rxAngular`.
11. Disable `zone.js` as the default Change Detection System
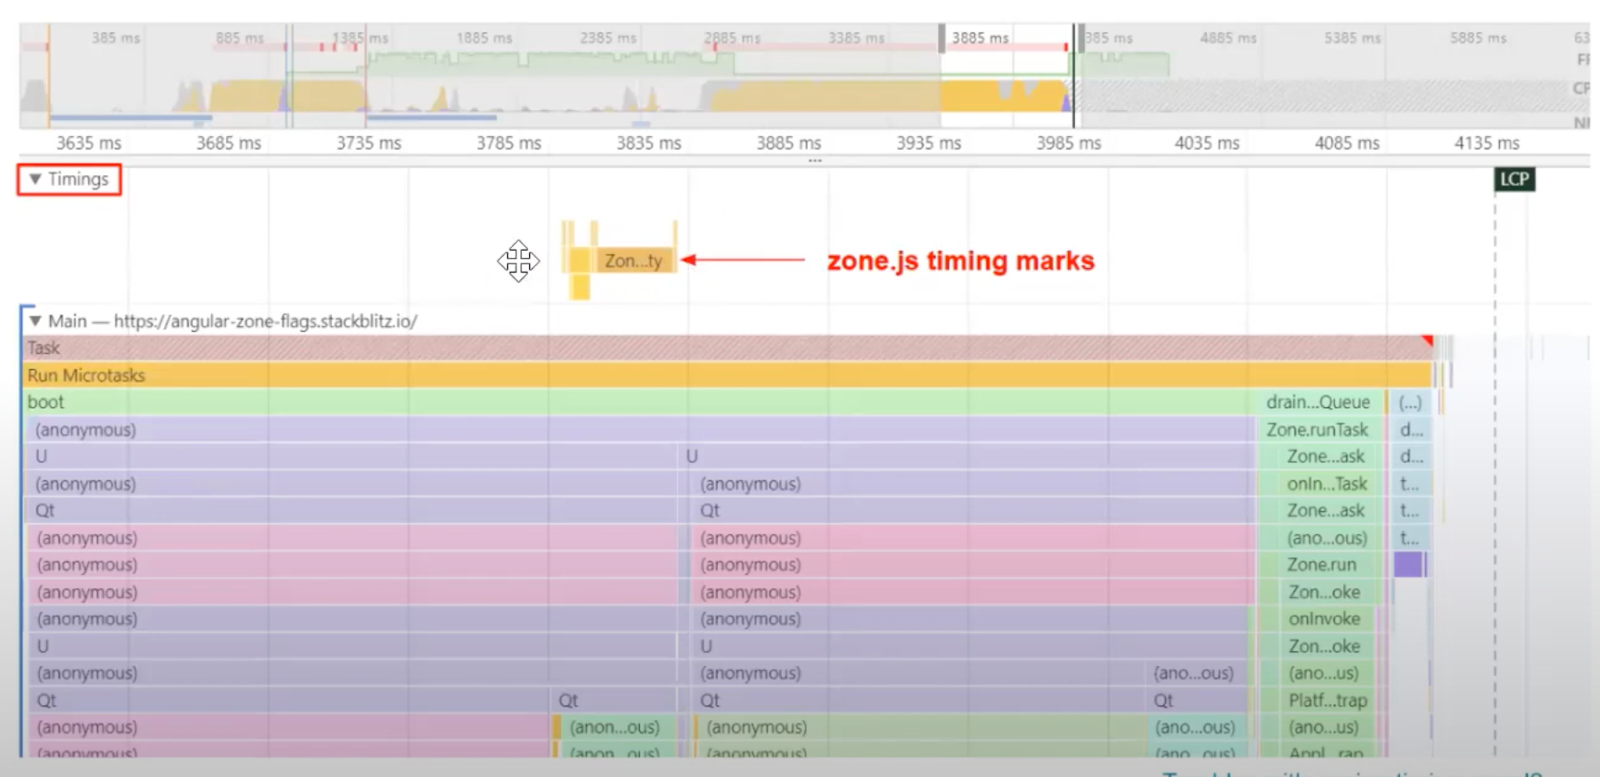
`zone.js` ships with a lot of kilobytes and spends a lot of time patching the API (the image blow is what `zone.js` looks like in the devtools), However, they play a crucial role in the Angular change detection system. Disabling `zone.js` will have a huge impact on your application as it will reduce both your app size and the number of blocking scripts. However, disabling `zone.js` requires a lot of manual logistics management.
Any component that doesn’t use the `async` pipe in the template can be considered zoneless. You can migrate your components one by one until your entire application is zoneless then disable zone for the entire application.
It might be difficult to work with observables but not allowed to use the `async` pipe in your code. `rxAngular` provides an elegant solution by offering alternate directives for Angular’s `ngFor`, `ngIf`, and `async` pipe. `rxAngular`’s `rxFor`, `rxIf`, `rxLet`, and `push` pipe has the same API as their Angular counterparts, but play nicely in a zoneless application. This allows you to do a minimal refactor to migrate your application off `zone.js`.
Disabling `zone.js` in your application could also have adverse effects if not careful. The manual management of change detections could cause performance issues by over-rendering. In addition, third-party libraries that use `zone.js` might also introduce problems to your zoneless application. So, be mindful of all the edge cases before migrating to a completely zoneless application.
12. Schedule app initialization into a new task to reduce Total Blocking Time (TTB).
Even with server-side rendering, it’s still common to run into problems with TTB caused by a long bootstrapping time. High TTB can negatively impact your lighthouse score as TTB accounts for 30% of the total score.
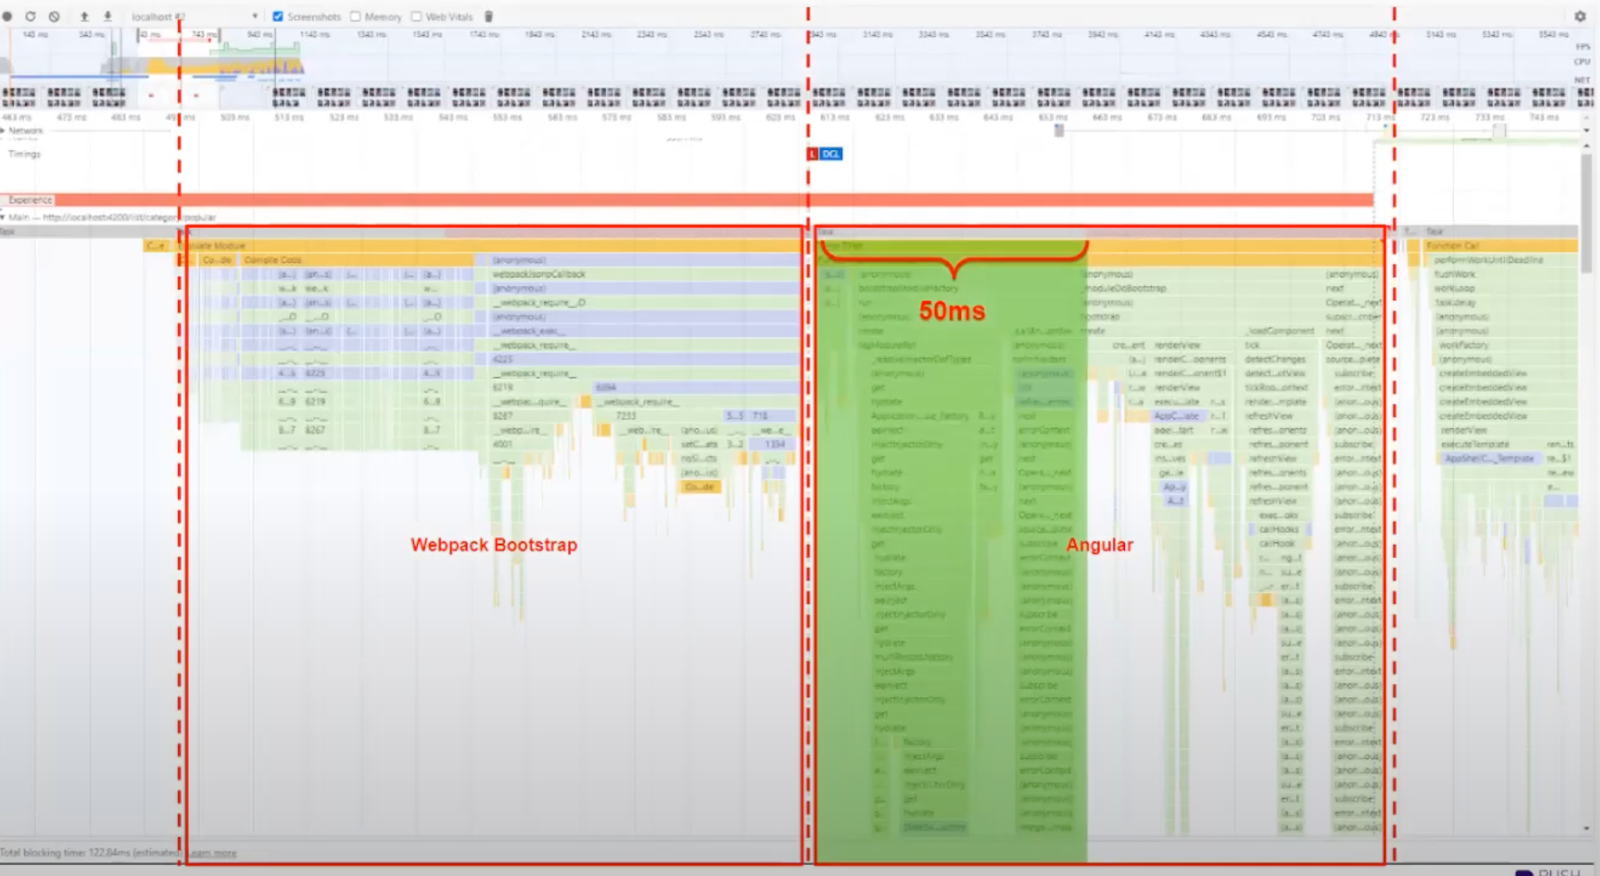
The image below shows the time it takes for the entire framework to finish bootstrapping.

The bootstrap process can be divided into 4 parts – webpack bootstrap, Angular bootstrap, app initializer, and routing, each contributing to the total TTB of your application.

This technique focuses on reducing the time it takes for Angular’s bootstrap process to finish. A way to speed up this process is to chunk them by wrapping the bootstrap process in a `setTimeout`. This schedules the app bootstrap, saving about 50 ms in TTB.
The image below shows where and how much time is saved by applying the changes above.
13. Disable initial sync routing and schedule navigation manually to reduce TTB
The next task that Angular performs affecting your application’s TTB is initial navigation. Similar to how we scheduled Angular’s bootstrap process, we can also disable the initial navigation and schedule it.
We can disable the initial navigation by setting the `initialNavigation` property of the root `RouterModule` to `disabled`.
Next, wrap the initial navigation in a `setTimeout` to schedule the navigation at a later time.
Following the steps above and delaying the initial navigation can save you another 50ms in your application’s TTB. The image below shows where and how much time is saved by applying the changes above.

14. Schedule and prioritize rendering tasks
`rxAngular` includes utilities to schedule and prioritize tasks to streamline the task management of your application. Used strategically, this fine-grained control over the tasks execution of your application can significantly improve your app performance, making your app feel a lot faster to the end-users. `rxAngular`’s scheduler accepts the following priorities:
- Immediate – Urgent work that must happen immediately is initiated and visible by the user. This occurs right after the current task and has the highest priority.
- User Blocking – Critical work that must be done in the current frame, is initiated and visible by the user.
- Normal – Heavy work visible to the user. For example, since it has a higher timeout, it is more suitable for the rendering of data lists.
- Low – Work that is typically not visible to the user or initiated by the user.
- Idle – Non-urgent work that should happen in the background and is not initiated but visible by the user. This occurs right after the current task and has the lowest priority.
You can read more about how `rxAngular` schedules and prioritizes the tasks in the official docs.
15. Fetch data included in main content on app initialization to reduce the time of Largest Contentful Paint (LCP)
This technique is about the data required to display the DOM nodes (the HTTP request required to get the data), instead of the rendering process itself. HTTP requests to fetch data to render the UI are often made quite late. This further delays the rendering process as the application has to wait for the data from the HTTP request before it can start rendering its contents.
You can use a factory in the app initializer to move the HTTP request earlier – in the bootstrap phase. Moving the HTTP request to an earlier stage makes sure that the data is ready before the component is rendered in the component tree, instead of loading the data as the component loads.
This technique combined with the prefetch and preload technique significantly improves your application’s data fetching process.
16. Pass Observables directly as inputs
This technique only works when using `rxAngular`. Using this technique with the default `async` pipe would not result in any performance improvement.
The `async` pipe is commonly used to subscribe to an observable which is then passed as a single value to the child component.
This approach can become slow if you’re passing down the value down multiple layers. Whenever you use the `async` pipe in a component, Angular initializes the dirty marking change detection which triggers the change detection cycle for each component down the component tree.
The image below shows how a change in the observable’s value affects the parent components when using the `async` pipe

Instead of using the `async` pipe before passing the observable, we can pass the observable and use the `push` pipe or the `rxLet` directive in the child component to subscribe to the observable. This is a more efficient approach as it skips triggering the change detection cycle on the intermediate components between the parent and the target child component. Using `rxAngular` to manage the subscription at the child component results in only the target component to re-render, reducing performance issues related to over-rendering.
The example above can be converted into the following:
The child component can then subscribe to the observable either by using the `push` pipe:
Or the `rxLet` directive:
The image below shows how a change in the observable’s value affects only the component that subscribes to the observables when using `rxAngular`’s `push` pipe or `rxLet` directive.

17. Use `rxFor` in favor of `ngFor` to get a non-blocking rendering of lists
Rendering a lot of `ngFor` can cause your application to freeze due to the rendering process blocking the thread. This can be seen from the noises in the flame chart below:

A solution to this problem is to use `rxAngular`’s `rxFor` instead of Angular’s `ngFor` to render large lists. `rxFor` has a built-in scheduling mechanism that allows it to spread the rendering task so it never blocks the thread. You can see the difference between both approaches by comparing the noiseless flame chart below with the one for `ngFor` above.

You can read more about the reasoning behind `rxFor` and how it compares to `ngFor` in the RFC.
18. Avoid using `@HostListener(‘document’)`
Avoid `HostListener`s wherever you can and use RxJs instead. RxJs is lazy and only creates the events when needed. `HostListener`s on the other hand, typically fire when the component bootstraps and it will continue to listen to events regardless if the events are used or not.
A common component that runs into performance issues when not careful is the drag and drop component. Be careful to not listen to mouse events indefinitely even when the user is not dragging anything. Instead, you should only start listening to the mouse move event after a mouse click has happened.
Conclusion
These are performance optimizations from the combined experiences of Michael and Christian that you can implement in your projects. All the techniques in this post are different ways to address various performance bottlenecks. Some might work better than others depending on your use cases. Identify your application’s bottlenecks, and use the recommendations from this post to fix them.
If you need help with performance optimizing your Angular apps you can reach out to us here.
Further reading
- Some of the techniques covered in this post uses the `rxAngular` library by Michael Hladky. You can read more about the library in their official docs.
- Another project by Michael Hladky helps with running performance measurements using lighthouse user-flow. Read more about the project in their official docs.
- A detailed guide on Angular performance tuning by Christian Lüdemann


